Showing posts with label Malibu Cross-Back Dress. Show all posts

Invisible Stitch Knit Binding

Monday, April 16, 2018


I love learning new sewing techniques, and when I do, I like to pass them along to you. We have previously posted 3 techniques for knit binding, so today I bring you a fourth with a special twist. The stitching is nearly invisible!! This binding method also reduces a little bulk if you happen to be using a thicker rib knit for the binding. I am using the Modkid Malibu Dress for this example, but the technique can be applied in multiple situations. Be sure to check out our Malibu Sew-Along for additional tips.


If you are new to sewing with knits, be sure to check out our Tips for Sewing with Knits. You will notice my binding strip is slightly shorter than the fabric piece. Binding should always be stretched slightly as you sew, so the end result will lay flat. Keep this in mind as we proceed. The seam allowance for the pattern is 1/2" and the binding width is 1.5". I am using ribbed knit in this case, but other knit types with good stretch and recovery would work well here. This technique would not apply to woven binding.

First, stitch the binding to the main fabric right sides together with a 1/2" seam allowance and a stretch stitch, stretching the binding slightly as you stitch. Here, I have used my serger that trimmed the seam allowance as I sewed. If you are using a regular sewing machine, be sure to stitch with a stretch stitch. Then trim the seam allowance to 1/4". A stretch thread such as Maxi-lock thread in your bobbin with provide additional stretch to the seam.


Press the seam open and the seam allowance toward the binding.


Wrap the binding around the seam allowance to the wrong side and press well.


Select a straight stitch on your machine. The triple stitch, number 6 on my machine, is perfect in this situation. It makes a straight stitch that still stretches by creating 3 back and forth stitches for every 1 stitch in length. Melissa of Melly Sews recently posted a great video showing this stitch. I recommend, again, using stretch thread in your bobbin. If your machine does not have the triple stitch, using a long straight stitch with stretch thread in the bobbin may still work. Test out the stretch to make sure it is sufficient.


To create the "invisible" stitch, you will stitch in the ditch between the main fabric and the binding. An edge stitch or blind hem foot can help keep the alignment here.


For best results, match the thread to the main fabric not the binding. You can just barely see the stitches in the lighter stripe of the fabric.


The raw edge of the binding remains exposed on the wrong side of the fabric, but one of the beauties of sewing with knits is that the fabric will not unravel. If the raw edge tends to curl, you can trim it a bid closer to the stitch line.


Always give your garment a nice, steamy press when complete to make sure any knit that gets slightly stretched in the process of sewing shrinks up to it intended shape.


Other patterns where this method might come in handy are the Modkid Lexi and the Malibu Misses. Be sure to let us know if you give this a try! 

Malibu Sew-Along // Results and Winners

Wednesday, May 13, 2015

We are so thrilled to see so many cute Malibu dresses show up for the sew-along!! Many of the participants challenged themselves to try knits for the first time. And, one even sewed two versions!!


The first participation prize of 5 Modkid PDF patterns goes to Carolyn Jordan. The second participation prize of 3 Modkid PDF patterns goes to Noor Raats. Congratulations!!


I have collected all of the sew-along posts in our Malibu Sew-Along Page, so you can access them at any time in the side bar of the blog. As always, our Modkid Fan Group loves to see what you make!

Malibu Sew Along // Day 5

Friday, May 08, 2015


The final day of the Malibu sew-along has arrived! Let's wrap things up!!


With the skirt wrong side out and the bodice right side out, slide the bodice inside the skirt and pin right sides together. Don't let the photo above confuse you! I flipped everything out to show you how close the back pieces should be when the bodice is pinned in place. The space between the back bodice pieces should be 1". All raw edges and side seams should be aligned.


Stitch the skirt to the bodice with a wide zig-zag stitch over the elastic. You will need to stretch the elastic to fit the bodice as you sew, but do not stretch the bodice fabric.


Turn the dress right sides out. Fold the area between the cross-back pieces to the wrong side encasing the elastic. Using a wide zig-zag stitch, sew the folded section down just between the back bodice pieces.


Hem the dress using your favorite method. Be sure to check out our favorite knit hemming tips! Here, I used washable hem tape to help with pressing a crisp edge and a twin stretch needle.

We can't wait to see your finished product!!

Be sure to add your photos of your completed Malibu to our Facebook Group before Monday, May 11th to be entered to win one of the prizes. You can share photos on Facebook and Instagram with hashtag #malibusewalong. We will post the winners next week!

See the rest of the Malibu Sew-Along here:

Malibu Sew-Along // Day 4

Thursday, May 07, 2015


We're moving on to the skirt today!! Note: All seam allowances are 1/2" unless noted otherwise.


Place two skirt panels right sides together. Pin and stitch along one long side only. Finish the seam and press it to one side. Open up the skirt panel on your work surface.


Mark the center of your elastic. Pin the center of the elastic at the skirt seam 1/4" from the top raw edge. Pin the two ends to the side edges of the skirt. Stretch the elastic to be even with the skirt panels and pin in several places in between keeping the elastic 1/4" from the top raw edge of the skirt.


Stitch the elastic to the skirt panels with a wide zig-zag stitch stretching the elastic as you go. You want the elastic stretched and the fabric flat but unstretched. Backstitch at each end to secure the elastic.


Fold the skirt panels right sides together and stitch the other side of the skirt closed. Finish the seam.

Tomorrow we will attach the skirt to the bodice and finish!

See the rest of the Malibu Sew-Along here:

We’d love to see your progress!! Show us your photos in our Facebookgroup. You can also share photos on Facebook and Instagram tagged #malibusewalong.

Malibu Sew-Along // Day 3

Wednesday, May 06, 2015


Today we will apply all of the bias tape you so diligently pressed yesterday.


With the bodice wrong side out, open up the bias tape and pin the right side of the bias to the wrong side of the bodice starting at the bottom of the back opening. Continue pinning all the way around the bodice, over the shoulders, and around the neckline. You will end up back at the bottom on the other side of the back bodice. Trim off the excess bias tape.


Stitch the bias tape to the bodice along the first crease line. Pay extra attention to the narrow shoulder areas, so you do not catch the bias for the other side in your seam. Go slowly and do not stretch your fabric as you go. For knit fabrics, I use a longer straight stitch with stretch thread in the bobbin.


Turn the bodice right side out and begin folding the bias tape to the right side using your creases as a guide. The raw edges should be completely encased by the bias tape.


Stitch along the inner fold of the bias tape. With knit fabrics, use a wide zig-zag or other stretch stitch. I used a triple stretch stitch with stretch thread in the bobbin of my machine.

If you are using FOE here, you will fold the FOE around the raw edges and stitch it with a stretch stitch stretching the FOE ever so slightly as you go.

See the rest of the Malibu Sew-Along here:


We’d love to see your progress!! Show us your photos in our Facebookgroup. You can also share photos on Facebook and Instagram tagged #malibusewalong.

Malibu Sew-Along // Day 2

Tuesday, May 05, 2015


Unless you are using pre-made bias tape or fold-over elastic (FOE), we've got a little bit of tedious work to start off day two. It will all be worth it though!!

Hopefully you've already cut your strips from Day 1. You will need to join strips to result in 2.5 yards of bias for sizes 2T to 5 and 3 yards for sizes 6 to 12. Woven fabric strips cut on the bias need to be joined at an angle. Knit fabric strips cut on the straight width of the fabric can be joined straight at the short ends.


Now, you will take your long skinny strips and start pressing. For knit bias, I highly recommend using spray starch to get crisp folds. First, press the strip in half long ways with wrong sides together to form a center crease. Open up the strip and fold both of the long edges in to the center crease. Press well. Finally, fold the strip in half again lengthwise encasing the raw edges. Press again. Bet you're glad that's done! Now, you can set it aside for a moment.


If you are sewing with knits for the first time, be sure to reference Patty's Tips for Sewing with Knits.

Note: All seam allowances are 1/2" unless noted otherwise.

Lay your front bodice on the table with the right side facing up. Lay one back bodice down right sides together aligning the shoulder and side edge. Stitch across the shoulder and down the sides of the bodice.


Lay the opposite back bodice piece right sides together with the front bodice overlapping the back bodice piece you just sewed. Stitch across the shoulder and down the side. Finish the seams with a serger or zig-zag stitch. Press the seam allowances to one side. 

Tomorrow we will be attaching that lovely strip of bias tape you created.

See the rest of the Malibu Sew-Along here:

We’d love to see your progress!! Show us your photos in our Facebookgroup. You can also share photos on Facebook and Instagram tagged #malibusewalong.

Malibu Sew-Along // Day 1

Monday, May 04, 2015


I'm so thrilled that it is finally time to sew a Malibu Cross-Back dress together! This pattern is one of my personal favorites!!


First, head to your computer and print out your pattern. Here are a few tips I like to use for printing:
  • Print the instruction pages on two sides (front and back). For the Malibu pattern, these are pages 2-7. I like to save ink by not printing the pretty cover and inspiration pages (1, 9-11), but that’s up to you. You may even choose to not print the instruction at all and have your digital copy handy while you sew.
  • Print the pattern pages (12-25) on a single side only. Make sure your scaling is set to “none”. For views A & C you only need pattern pages 12-16. 
  • Above all, utilize the test squares to make sure your pattern has printed at the full scale.


Next, cut all pattern pieces of your desired size. Be sure to include the gray/shaded areas in your cuts.


Overlap the shaded areas, as indicated on the pattern pieces, and tape each piece together to form the full pattern pieces.

Now you are ready to cut into your pretty fabric! You’ll need to refer to the cutting diagram in the pattern for the layout based on the fabric type. For views A and C, refer to the cutting charts for the skirt panel dimensions. You will also need to cut 1.5" wide strips of bias tape. Refer to page 4 of the pattern for bias tape cutting instructions.


That's it for today!

See the rest of the Malibu Sew-Along here:

We’d love to see your progress!! Show us your photos in our Facebookgroup. You can also share photos on Facebook and Instagram tagged #malibusewalong.

Malibu Sew-Along // Schedule and Prizes

Thursday, April 30, 2015

The Malibu Sew-Along begins Monday, and we couldn't be more excited!!


Here is a breakdown of what we have in store for each day of the sew-along:
  • Day 1:  Prepare the pattern and cut and prepare the pattern pieces.
  • Day 2:  Create the bias binding and begin the bodice.
  • Day 3:  Attach the bias binding to the bodice.
  • Day 4:  Prepare the skirt.
  • Day 5:  Attach the skirt and bodice and hem.
PRIZES:

Two sew-along participants will be selected at random to win Modkid PDF patterns of their choice!!


Here is exactly how to participate:
  • Sew along with us or at your own pace.
  • Post progress photos in our Facebook Group or Instagram with hashtag #malibusewalong
  • Photograph your finished dress and add it to the Facebook Group. Post photos of your dress to Facebook and Instagram using the tag #malibusewalong, so we can all find you. 
To be eligible for the grand prize, be sure to add your photos by Monday, May 11th. Please only add photos you don’t mind us sharing on the blog!

Grab your materials, wash and dry your fabrics, and get ready to sew!!

Malibu Sew-Along // Supplies

Tuesday, April 28, 2015

We hope you've marked your calendar to join in with our Malibu sew-along!! Today, we’re talking supplies, so you can gather what you need before we get started on May 4th.

PATTERN

First and foremost, you will need the Malibu Cross-Back Dress pattern. Remember, coupon code MALIBUSAL2015 gets you 30% off your entire order in the Modkid Etsy store. The coupon code expires on Friday, May 1st at midnight EST.


FABRIC

The suggested fabrics include: Woven fabrics such as quilting cottons, shirting, voiles, gauzes, and lawns. Or, knit fabrics such as jerseys, interlocks, stretch velvet or stretch velour.  Here are the fabric requirements:


NOTIONS

In addition to fabric, you will need the following notions:  1/4" wide knit or clear elastic - 1/2 yard for sizes 2T-5, 2/3 yards for sizes 6-12.

OPTIONAL NOTIONS

The following items are not required, but you may find them helpful:


  • Spray Startch
  • twin stretch needle
  • hem tape
  • In lieu of making your own binding, you can use Fold Over Elastic (FOE) or pre-made double fold bias tape. You will need 2.5 yards for sizes 2T-5 or 3 yards for sizes 6-12.
We love seeing your fabric selections, so be sure to show them off on our Malibu Sew-Along Event Page

Malibu Sew-Along

Monday, April 27, 2015

We know more than a few of you have been eager to see a knit pattern featured in a sew-along. We put it to a vote, and we hope you are as thrilled with the selection as we are!! Bonus: The Malibu Cross-Back Dress can be sewn in either knits or wovens or a combination of the two!


DATES

The sew-along will be May 4-8. So put it on your calendar now! Between now and then we’ll be posting what you’ll need, the schedule, and prizes. During the sew-along we’ll tackle a few steps each day to take you through the pattern. The Modkid Malibu is the perfect dress for summer style!

PRIZES

There will be two overall participation prizes awarded at random. Stay tuned for prize details!

HOW TO ENTER

You’ll want to post your finished ensemble by Monday, May 11th to be entered to win the final prize. Post photos to the Modkid Fan Group page. Also, post dress photos to Facebook and Instagram using the tag #malibusewalong so we can all find you. 

WHERE TO BUY and COUPON

Want more good news!?! Coupon code MALIBUSAL2015 gets you 30% off your entire order in the Modkid Etsy store. That’s ANYTHING you buy in the shop not just the Malibu Pattern!! The coupon code expires on Friday, May 1st at midnight EST. So hurry over to grab your copy!


Hello From Courtney!

Thursday, July 03, 2014

Hello my fellow Modkid fans! Patty gave me such a great welcome at the beginning of the week, and now I’m here tell you how excited I am to be part of the Modkid team! Way before I was pattern testing for Patty, I was sewing Modkid patterns. And I just can’t stop! Thankfully, my photo skills have improved a tad since the time of some of these outfits. These Ava tops are near and dear to my heart since I made them for my now 6 year old and they've been passed down to my 2 year old.

Flower Ava

Modkid Intro

I couldn’t wait for the release of the Modkid Style book, and this is one of many items I’ve sewn from it.

Modkid Intro


Fast forward a bit closer to the present, and I have to let you know that I rarely only sew a Modkid pattern for testing. They are just too good and demand to be lived in, played with, and worn for fun! You saw several of my tester photos in Patty’s post, but here are a few that came after the fact. This is the Bailey Romper.

Modkid Intro

When I pattern tested the Zoey Summer Ensemble, I sewed it for my two year old. Well, big sis certainly needed one too.

Modkid Intro 
I always try to mix things up a bit, a tendency I hope to bring to some of my Modkid posts to show different ways to take a Modkid pattern even further. Here I added a pintuck detail to the Hailey Girls Top.

 Modkid Intro


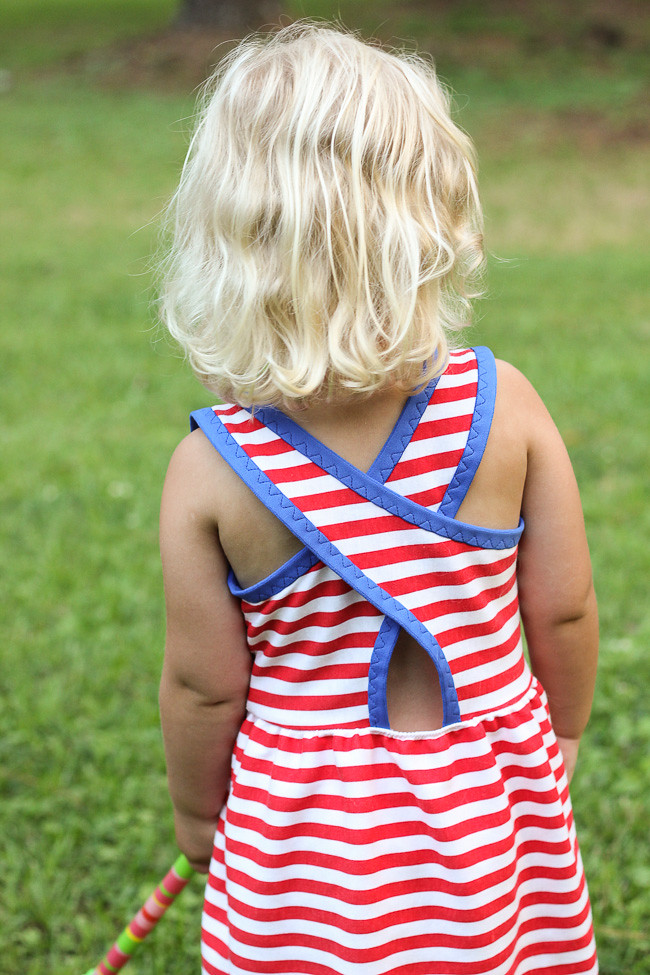
Finally, I couldn’t leave you without something new, so I used the super speedy Malibu Cross-back dress pattern for a little 4th of July fun.

Modkid Intro

I just love this back!! And, with the aid of Fold Over Elastic for the binding, it all came together in no time.

Modkid Intro

Now, for a few random things about me just so we’re all comfortable here:
  • I’m a Texan at heart transplanted to the South. (No, Texas isn’t considered part of The South)
  • Cop shows have always been my favorite, and now I’m married to one.
  • My favorite color is purple.
  • As you may have guessed, I love dessert especially cupcakes.
  • I can’t spell. Thankful for spell check!
Hopefully, we’ll all have a chance to get to know each other better through this awesome sewing community. We’re chatting away on the new Facebook Group, so come join us!
Proudly designed by | mlekoshi Playground |