Showing posts with label Melanie. Show all posts

Pajama Inspiration from Modkid

Monday, December 12, 2016

For those of you with Christmas pajamas still on your list to sew, I thought I would give you some pattern inspiration from Modkid. 


The Vivian Shirtdress and Nightgown is the only pattern in the list designed with a nightgown in mind, but don't let that limit you!!


This comfy knit nightgown was created using the Melanie pattern. The only alteration was to omit the side pockets and add a bottom ruffle.


The Tandy top paired with shorts makes a great set. You can experiment with a woven body for the top as long as the yoke is made in knit. The dress version would also make a great nightgown.

For another PDF pattern option, the Modkid Dakota makes a great pajama top or lengthen it for a nightgown. 


Finally, don't forget the Modkid paper patterns!! The Quinn dress in flannel makes a great nightgown. The pajamas on the left in the photo above combine a shortened Quinn dress and Sophie pants.

Check out the Grace, Penny, or Morgan for other possible pajama / nightgown patterns. Just don't limit yourself!!

Patty has a fun special running right now that can take care of two gifts in one!! Her coloring books make wonderful gifts for that awesome kid (or kid-at-heart) who loves to color! And her sewing books make great gifts for all those crafty friends of any age. BONUS! From now until Dec. 22nd, buy any book (coloring book or sewing book) on the Modkid website and receive a FREE paper sewing pattern of your choice. No coupon code necessary. Just tell us which sewing pattern you would like, in the NOTES section at check out, and we will include it in the package free of charge! (If you buy 2 books, you can choose 2 patterns... and so on!) Happy Shopping!!

Melanie Sew-Along // Results and Winners

Tuesday, October 27, 2015

The Modkid Melanie has been a fan favorite, and you can see why by the sew-along participants photos!! We love every variation, and the creative minds that made costumes out of the Melanie pattern!


The first participation prize of 3 Modkid PDF patterns goes to Nicole Scott. The second Halloween costume prize of 2 Modkid PDF patterns goes to Jodie McNames. Congratulations!!


I have collected all of the sew-along posts in our Melanie Sew-Along Page, so you can access them at any time in the side bar of the blog. As always, our Modkid Fan Group loves to see what you make!

Melanie Sew-Along // Day 5

Friday, October 23, 2015


It's the final day of the Melanie Sew-Along, and we are so eager to see your creations!! There are two methods given in the pattern for finishing the neckline. I am actually giving you a third option!


First, measure the distance around the neckline of the dress. The length of the neckband piece needs to be 90% of this length.


The width should be 2". Cut the neckband piece to those dimensions.


Fold the neckband in half lengthwise wrong sides together and press. Open up the fold and stitch the short ends right sides together. Refold and press the neckband.


With right sides together, pin the neckband to the neck opening. The neckband will be slightly shorter than the neck opening, so divide each into quarters and line up those points. Then pin in between.


Stitch the neckband to the dress stretching it slightly as you go. Be sure to use a stretch stitch or a serger. Topstitch the seam allowance on the dress side of the seam with a stretch stitch or twin needle if desired.


Hem the bottom of the dress 3/4". Here, I pressed the edge under 3/4" and stitched it in place with a twin needle. Refer to page 7 of the pattern for additional hem options.

Do a happy dance, because you are finished!!

Be sure to add photos of your completed Melanie Dress to our Facebook Group before the end of the day Monday, October 26th to be entered to win one of the prizes. You can share photos on Facebook and Instagram with hashtag #melaniesewalong. We will post the winners next week!

See the rest of the Melanie Sew-Along here:


Melanie Sew-Along // Day 4

Thursday, October 22, 2015


Let's get started with Day 4! All seam allowances are 1/2 unless noted otherwise.


With the dress wrong side out, align the raw edges of the shoulders. With right sides together stitch the front to the back at the shoulders.


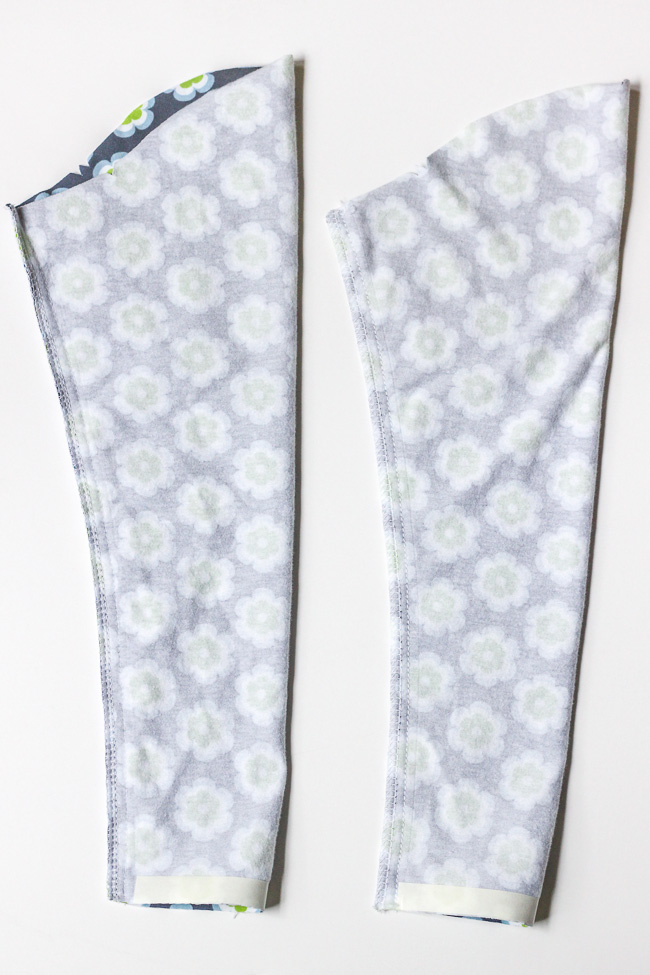
Prepare the sleeve hem by either pressing the raw edge to the wrong side 1/2 to create a crease or apply hem tape. Open up the hem, and fold the sleeve right sides together lengthwise and pin the underarm seam. Stitch with a 1/2" seam allowance.


Press the hem back under and stitch in place with a stretch stitch or twin needle. See page 7 of the pattern for other hemming techniques.


With the sleeve right side out and the bodice wrong side out, insert the sleeve into the opening. With right sides together, pin the sleeve in place aligning the single notches in front and the double notches in back. Also align the top notch with the shoulder seam and both underarm seams. Stitch in place. Go slowly to avoid any puckers.

Tomorrow we finish the dress!

See the rest of the Melanie Sew-Along here:


We’d love to see your progress!! Show us your photos in our Facebook group. You can also share photos on Facebook and Instagram tagged #melaniesewalong.


Melanie Sew-Along // Day 3

Wednesday, October 21, 2015


Today, we will be putting together the main body of the dress. Keep in mind all seam allowances are 1/2" unless noted otherwise.


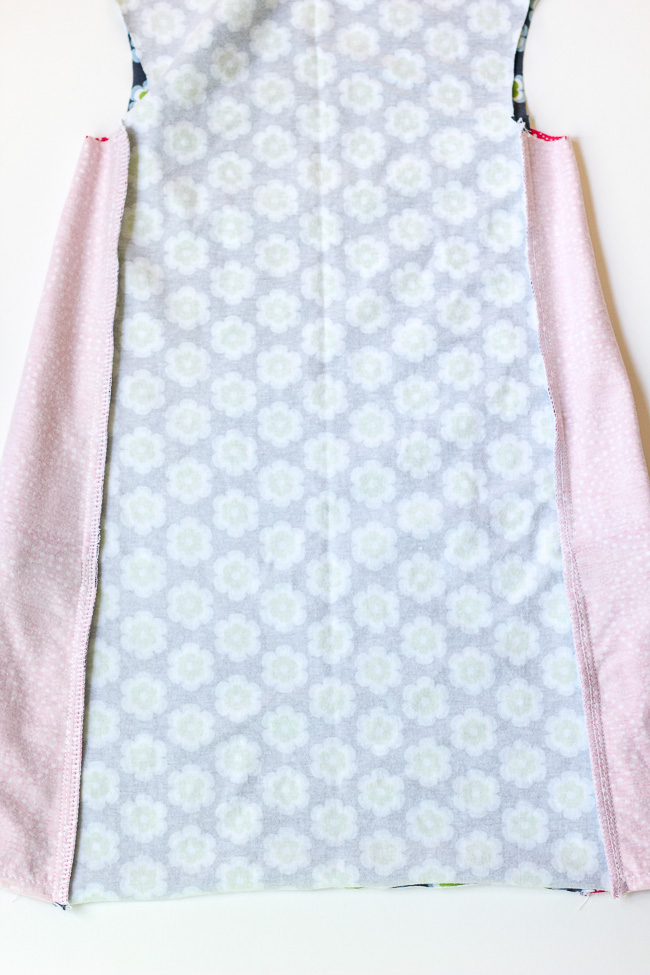
Pin one side gore piece right sides together with the center front piece. Stitch in place. Press seam toward the center front.


Repeat for the other side gore.


Align the side raw edges of the back center piece with each of the side gores. Pin in place right sides together.


Stitch in place and press seam toward the center back.Tomorrow, we will inserting the sleeves!

See the rest of the Melanie Sew-Along here:


We’d love to see your progress!! Show us your photos in our Facebook group. You can also share photos on Facebook and Instagram tagged #melaniesewalong.

Melanie Sew-Along // Day 2

Tuesday, October 20, 2015


We get to start with one of the cutest details about the Melanie today, the pockets! Note: All seam allowances are 1/2" unless noted otherwise.


Sew a long gathering stitch between the dots on each pocket piece. Gently pull the bobbin thread of the gathering stitch to gather the pocket to the width of the pocket binding piece. Gently press the gathers to lie flat. Repeat for the second pocket.


Next, take your pocket binding piece and press it in half lengthwise wrong sides together. Open up the fold and press the long edges to meet at the center fold.


Press the binding piece in half again enclosing the long raw edges. Repeat for the second binding piece.


Open up the binding piece. With right sides together, pin the long raw edge of the binding to the gathered edge of the pocket piece. Stitch the binding to the pocket along the first fold (about 1/2"). Fold the binding piece up and over the edge of the pocket being sure the raw edge of the binding is tucked under. All raw edges should now be enclosed. Topstich on the right side of the binding being sure to catch the folded edge of the binding on the back side. Repeat for the second pocket.


With all right sides facing up, pin a pocket piece to a side gore piece using the pocket placement mark as a guide and aligning the raw edges. Baste around the sides and bottom of the pocket. That's it for Day 2!

See the rest of the Melanie Sew-Along here:


We’d love to see your progress!! Show us your photos in our Facebook group. You can also share photos on Facebook and Instagram tagged #melaniesewalong.

Melanie Sew-Along // Day 1

Monday, October 19, 2015

REMEMBER, today is the last day to use coupon code MELSAL2015 for 30% off any pattern in the Etsy Shop!!


Welcome to Day 1 of the Melanie Sew-Along. We hope you've been inspired and gathered your supplies. Today we are preparing our pattern and cutting out the pattern pieces. Let's get started! 

First, head to your computer and print out your pattern. Here are a few tips I like to use for printing:
  • Print the instruction pages on two sides (front and back). For the Melanie pattern, these are pages 2-6. I like to save ink by not printing the pretty cover and inspiration pages, but that’s up to you. You may even choose to not print the instructions at all and have your digital copy handy while you sew.
  • Print the pattern pages (10-26) on a single side only. Make sure your scaling is set to “none”. 
  • Above all, utilize the test squares to make sure your pattern has printed at the full scale.


Cut the pattern pieces to your desired size. Be sure to include the gray/shaded areas in your cuts.


Overlap the shaded areas, as indicated on the pattern pieces, and tape each piece together to form the full pattern pieces.


Use the pattern layout guide on page 3 to cut out your fabric pattern pieces. That's it for today!

See the rest of the Melanie Sew-Along here:
We’d love to see your progress!! Show us your photos in our Facebook group. You can also share photos on Facebook and Instagram tagged #melaniesewalong.

Melanie Sew-Along // Halloween Inspiration and Templates

Friday, October 16, 2015

Yesterday, we announced there would be a Halloween prize component of the Melanie Sew-Along. Patty LOVES Halloween, so we're including that little incentive. At first we weren't sure where the Melanie Dress would fit in with Halloween looks, so I started gathering a few ideas I could share with you. Let's start with the blank canvas of the dress and work our way from there.


Speaking of blank canvas, doesn't that front panel just scream for an embellishment!?! It's the perfect spot for applique or stencils and paint. When I mentioned this to Patty, she generously selected a few of her Halloween Silhouette designs for you to use as free templates!!

Cat Template

Ghost Template

Jackolantern Template

Spider Template
Click on the image above to download. The files are also available in our Modkid Facebook group. I can just see the ghost on a white dress with funky zebra print side panels!

How about letting the accessories do all the talking?!? I love making everyday dresses for my daughters, and bringing out the costume side with the accessories. Try one of these headband ideas. Click the link below the image for the full tutorial.


Finally, if you have a little super hero fan, a spiderman inspired dress might be just the thing! It's a perfect way to play up those cute side panels, and you could use the spider template above!


Don't forget that coupon code MELSAL2015 gets 30% off in the Etsy shop until Monday, 10/19, at midnight EST.

Melanie Sew-Along // Schedule and Prizes

Thursday, October 15, 2015

We will begin the Melanie sew-along first thing Monday morning!! Monday, until midnight EST, is also the last day to use coupon code MELSAL2015 for 30% off the Melanie pattern or any others in the Etsy shop. 


SCHEDULE:

Here is a breakdown of what we have in store for each day of the sew-along:
  • Day 1:  Prepare the pattern and cut and prepare the pattern pieces.
  • Day 2:  Prepare the pocket.
  • Day 3:  Attach the side panels.
  • Day 4:  Attach the sleeves.
  • Day 5:  Finish the neck and hem.

PRIZES:

One sew-along participant will be selected at random to win Modkid PDF patterns of their choice!!


For even more fun, there will be a Halloween category! We will select one winner for a Halloween inspired look or costume to win 2 Modkid PDF patterns of their choice.

PARTICIPATION:

Here is exactly how to participate:
  • Sew along with us or at your own pace.
  • Post progress photos in our Facebook Group or Instagram with hashtag #melaniesewalong
  • Photograph your finished dress and add it to the Facebook Group. Post photos of your dress to Facebook and Instagram using the tag #melaniesewalong, so we can all find you. 
To be eligible for the grand prize, be sure to add your photos by Monday, October 26th. Please only add photos you don’t mind us sharing on the blog!

Grab your materials, wash and dry your fabrics, and get ready to sew!!

Melanie Sew-Along // Supplies

Tuesday, October 13, 2015

We hope you've marked your calendar to join in with our Melanie sew-along!! Today, we’re talking supplies, so you can gather what you need before we get started on October 19th.

PATTERN

First and foremost, you will need the Melanie dress pattern. Remember, coupon code MELSAL2015 gets you 30% off your entire order in the Modkid Etsy store. The coupon code expires on Monday, October 19th at midnight EST.


FABRIC

The suggested fabrics include: Stretch knits only - cotton interlock, jerseys, matte jerseys, lightweight double knits, stretch velvet. The chart below is based on 58"/60" wide fabrics. 


Melanie Sew-Along

Monday, October 12, 2015


DATES

The sew-along will be October 19th-23rd. So put it on your calendar now! Between now and then we’ll be posting what you’ll need, the schedule, and prizes. During the sew-along we’ll tackle a few steps each day to take you through the pattern. The Modkid Melanie is a comfy knit dress with 3 sleeve lengths to suit any season.

PRIZES

There will be a participation prize and a Halloween related prize. Stay tuned for prize details! 

HOW TO ENTER

You’ll want to post your finished dress by Monday, October 26th to be entered to win one of the prizes. Post your photos to the Modkid Fan Group page. Also, post dress photos to Facebook and Instagram using the tag #melaniesewalong so we can all find you. 

WHERE TO BUY and COUPON

Want more good news!?! Coupon code MELSAL2015 gets you 30% off your entire order in the Modkid Etsy store. That’s ANYTHING you buy in the shop not just the Melanie pattern!! The coupon code expires on Monday, October 19th at midnight EST. You might want to grab the Melanie Misses while you are at it!

Modkid Styled - Melanie

Tuesday, April 14, 2015

The Modkid Melanie is one of those dresses that works great for play, school, or church. We love how easy it is to sew and wear!! For those who love a Mommy and Me look stay tuned for the next Styled post!


  1. Marigold Vivid Fireworks
  2. Spearmint Vivid Fireworks
  3. Headband
  4. Shoes
  5. Anklet

13 Days of Modkid Halloween // Day13

Friday, October 31, 2014


Patty here. I hope you have enjoyed our 13 Days of Modkid Halloween series. I had a blast looking at all your awesome creations! On this last day of our series, I am here to share another one of my spooky creations...

My oldest daughter, Sophie, will be 13 in just a few short weeks, and what do teenagers love? Zombies! So, I wasn't the least bit surprised when she asked me to make her a zombie costume. We had discussed a few other ideas... Day of the Dead Sugar Skull made with our Frida pattern was one of them... but she kept coming back to ZOMBIE, so I had to oblige. Of course, I had to modify one of our patterns for the costume and I am so happy I did! Check out the results (full details are at the end of this post).


Pattern: I used the Melanie Misses pattern, size XS, and left the sleeves and hems unfinished. The over-dress is also the Melanie Misses but cut 2 sizes bigger and without sleeves. I left all edges unfinished and shredded the bottom. Psst... this pattern is also available in little kids sizes.

Fabric: The underdress is made with Monster Shreds and the overdress is made with Bloody Lace, both found at Jo-Ann Fabrics.

Accessories: Sophie is wearing these awesome Halloween tights purchased at Target. Make-up and fake blood are also from Target.

Thank you so much for following along on our 13 Days of Modkid Halloween! I leave you with a fun little clip I created to celebrate the season:


MODKID PDF patterns can be found on EtsyCraftsy, and YCMT 

MODKID Paper patterns can be found here 

Did we inspire you to make a costume with one of our patterns? Share your photos on Facebook, Instagram or Twitter and tag them with #modkidhalloween or post photos in our Facebook Halloween album.  We would love to feature you next year! HAPPY HALLOWEEN!

Proudly designed by | mlekoshi Playground |