Showing posts with label Hailey Misses. Show all posts

Modkid Modified // Hailey with Elastic Casing

Wednesday, June 27, 2018


The shirred empire waist of the Modkid Hailey top and dress pattern creates a fitted silhouette that is comfortable and stretchy. Shirring with elastic thread is a fun technique to learn, but we often see requests for an alternative. An elastic casing is the solution. After sewing up an eyelet coverup style Hailey for myself, I decided one for my daughter was in order. I have applied an elastic casing tutorial for your use.


In addition to the free shirring tutorial for the Modkid Hailey, we have a knit neck binding tutorial, so be sure to check that out before diving in. After completing the first three steps of the Hailey pattern instructions for the bodice, sew the side seams below the arm opening and finish the seam allowances. Also, sew the side seams of the skirt pieces and finish the seam allowances. You will now have a separate bodice and skirt piece.


Turn the bodice right sides out and place it inside the skirt so that the right sides are together.


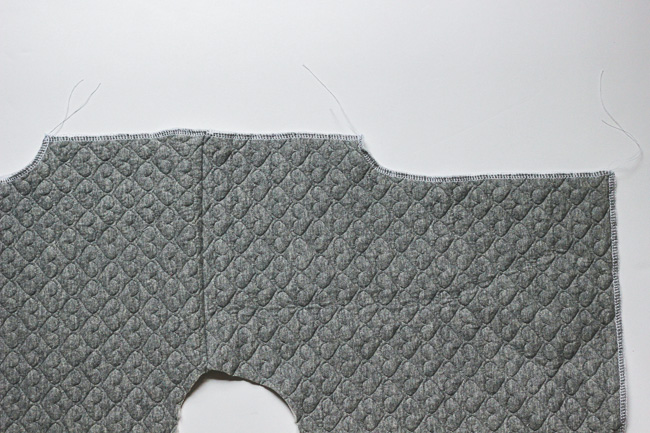
Align the raw edges and sew the seam with a 1/2" seam allowance. Finish the seam, but make sure NOT to trim off any of the seam allowance. Press seam allowance toward the skirt.


Sew a casing by stitching the seam allowance to the skirt 1/8" from the finished edge. Leave a 2" gap close to the side seam for inserting the elastic.


Cut a 1/4" wide piece of elastic the same length as the under bust measurement. Using a safety pin or bodkin, thread the elastic through the casing. Overlap the elastic 1/2" and sew the ends together making sure the elastic is not twisted inside the casing. Now is a good time to check the fit and adjust the elastic as needed. Very tight elastic here may not result in a comfortable fit. Sew the casing closed at the 2" opening.


Hem the dress or top and you are done!! You can find more photos of this Hailey on Sweeter Than Cupcakes.

Don't forget that we have 3 different size ranges for the Hailey pattern, GirlsTween, and Misses. This elastic casing method will work well for all three!

Modkid Hailey and Bundles!!!

Monday, February 06, 2017

By popular demand, BUNDLES have been added to the Modkid Etsy shop!! You can now buy all of our "Mommy and Me" patterns (HaileyMelanie and Malibu) as 2-piece bundles that cost $15.95, which is a saving of $4.00 from the cost of buying them separately.

Today, I am highlighting the Hailey girls pattern, and the many ways it can be styled. This may just become your favorite little black dress!! 


 From poolside, to a rodeo, to a formal gathering, the Hailey has you covered. We have layered and accessorized a few of our favorite looks, but the options are limitless!


It's not a stretch to envision each of these looks for the Misses Hailey as well! How would you wear your Hailey? Don't forget the Hailey first started as a paper pattern in Teen sizing, so every size range is covered.

Modkid Modified // Hailey Pullover

Thursday, January 07, 2016


The Modkid Hailey pattern is usually reserved for warmer temperatures. Today, I am transforming the Hailey to a pullover for layering in cooler temps. It is quite a transformation, but the steps are pretty simple.


You will only need the Back Bodice pattern piece. Trace the Back Bodice pattern piece onto a piece of freezer paper or tissue paper to create a new pattern piece. Lengthen the top as desired using a well fitting shirt as a guide. Keep in mind you will have a 1/2" hem, and you may want the top to hit shorter than the top you will layer it with. I added 5.75" to this size 4 pattern piece.


Now, create the front pattern piece. The front pattern piece is a duplicate of the back, but the neck scoops down further. Again, use another pattern or a well fitting shirt as a guide.


Cut the front and back pattern pieces from your fabric. I recommend fleece or sweatshirt fabric for this look. Just be sure you have at least 25% stretch with good recovery.


Sew the front piece to the back piece along the shoulders right sides together. Finish the seams.


Open out the top and finish all of the outer edges. If your fabric does not fray, you may skip this step.


Turn the underarm seams 1/2" to the wrong side and hem. Go slow along the curves. Repeat at all four underarm seams.


Next, fold the front bottom hem to the wrong side 1/2" and sew in place. Repeat for the back.


Fold the sleeves to the wrong side 1/2" and sew in place. Repeat for the opposite side.


For the mock turtleneck, you will need to cut a rectangle to fit the neckline. Measure the distance around your neck opening for the length. Mine measured 14.25". Add 1" for seam allowances. I used 5.5" for the total height. So, my rectangle was 15.25" x 5.5". Fold the neck right sides together and sew the short ends with a 1/2" seam allowance. Press the seam open.


Fold the neck in half along the long side with the right side facing out.


Place the neck band around the neck opening of the top right side together and sew in place. Be sure to use a stretch stitch here since the neck area with need to stretch overhead.


Fold the front over the back and stitch the front to the back under the arm opening. Stitch over your previous hem stitches.


Secure the sides together with 3 buttons spaced evenly on each side.


Done! Layer up your modified Hailey for those cooler temps! Don't forget this method would work for the Hailey Misses and Hailey Tween/Teen as well!


Tips & Tricks: Knit Binding

Friday, May 22, 2015

I learned a new tricks that I'm excited to share with you today. It's the perfect finish for a Hailey top or dress when you are sewing with woven fabrics. Knit binding!!


I love this technique for the smooth finish, but also for the soft feel. T-shirt scraps are cheaper than pre-made bias tape too!


I'm using the Modkid Hailey to illustrate the knit binding technique, so I started with the bodice with the front seam still un-sewn. You will also need a 1" strip of knit fabric.


Pin the wrong side of the knit to the right side of the bodice aligning the raw edges.


Stitch the binding to the neckline with a 1/2" seam allowance.


Trim the seam allowance to 1/4" and clip the curve.


Press the seam to the wrong side and the binding away from the neckline.


Press the knit binding to the wrong side of the bodice rolling the seam to the inside slightly, so the binding will not be visible from the right side.


Stitch the binding down from the right side with a 3/8" seam allowance.


Trim the knit binding if needed. The knit edge will not fray, so you are done!


Close up the neck per the pattern instructions.


Of course, this technique isn't limited to Hailey Girls! We would suggest it for Hailey Misses, Hailey Tween, and Josie. It would work great for binding an arm hole as well!
Hailey Misses and BundleUp!

"Ask and you shall receive" has always been our motto here at MODKID! So many times we have designed specific patterns based on customer feedback and popular demand, and this is no exception. When we released our Hailey Girls pattern a few months back, a little girls' version of our already popular Hailey pattern for tweens/teens, it immediately became one of our top sellers and its popularity was followed by countless requests for a women's version.

Well, your wait is finally over! And as if this release wasn't exciting enough, we have added it to the current BUNDLE UP collection, so you can get not only this awesome pattern, but 11 other patterns for women, designed by the industry's top PDF pattern designers!! (NOTE: If you are interested in Hailey Misses alone, the pattern will be listed on our Etsy and Craftsy stores on July 10th.)

Let's talk about Hailey Misses first and then I'll tell you all about the BundleUp collection.
Hailey is a flirty dress and shirt with several length options designed for women. It is a versatile pattern sewn with either wovens or knits, and with no zippers, buttons, or snaps, it sews up in a flash. A comfy and stretchy shirred section below the bust creates a feminine silhouette while making this garment versatile for women of all shapes and sizes.

Never sewn with knits before? No worries! Sewing with knits is easy and fun with this step-by-step guide which includes lots of tips, photos and diagrams to guide you along.


Our tester, Kara Orr of www.leighleecollection.blogspot.com sewed up View B (Tunic) in a woven cotton fabric.


Our pattern tester, Courtney Davis (www.sweeterthancupcakes.blogspot.com) sewed up View A (Top) in a soft jersey fabric.


Our pattern tester, Crystal Dekker (www.thatswhatshecrafted.blogspot.com), made View A (Top) in chiffon with the idea of wearing it with a little cami underneath.


And last, but certainly not least, our tester, Jenny Fish, at www.sewprettydresses.blogspot.com, sewed up View C (Dress with no ruffle) of Hailey Misses and she used Zig Zag Dot (jersey) from Heaven & Helsinki by Patty Young. Read Jenny's review here.


We've also found two additional non-tester pattern reviews here and here.

Now, for information about BundleUp:

Bundle UP is a collective of your favorite established PDF sewing pattern designers coming together to offer you a sweet deal on both hot new patterns and your favorite closet staples from past releases. We’ve selected the perfect patterns with YOU in mind- mix and match styles, and patterns with multiple views and lots of options. No matter the occasion, we’ve got you covered.
Soooo... Who is part of the new BundleUp, you ask?


Anddddd... What sort of patterns will I find in the new BundleUp? Well, I'm glad you asked, because we happen to think you can create an entire Summer wardrobe with just the patterns in this bundle. Check it out: (And, yes! The coloring book is a FREE download included with the purchase of your bundle!! Yippee!)


Ok!!! Anything else I should know?

As a matter of fact, yes!  There is a HUGE giveaway associated with the new BundleUp. If you sew up a pattern from the bundle and share it here, you can be entered to win this amazing prize package!


So, what are you waiting for?? Get the Bundle, start sewing and enter the giveaway!!! It's what all the cool kids are doing these days! :)
Proudly designed by | mlekoshi Playground |