Showing posts with label tips and tricks. Show all posts

Modkid Modified // Brynn Top with Double Piping

Wednesday, April 25, 2018


You will notice in the notions section of the Modkid Brynn Top pattern for girls and tweens/teens, piping is listed as an alternative to the ruffle trim that outlines the bodice and arm opening. I took the piping a step further with double piping!


Double piping is a unique technique that really pops! I followed the detailed double piping tutorial over on the Martha Pullen site. The main fabric for the top is Flit and Bloom, Bloom Geo Blossom in Teal. The coordinates for the piping are Riley Blake solids in Green and Fuchsia.


I have a few tips for sewing and applying the double piping that I will pass along. After preparing the piping per the tutorial, be sure to trim down the piping seam allowance to 1/2" to match the pattern seam allowance. The trickiest part about working with the double piping is the resulting thickness of your seams. Once way to reduce thickness at the seam allowance is to trim away the cording of the piping. To do this, pull the cording out of the end of the piping. I used the Turn & More Tool here. Trim away 1/2" of the cording and pull the piping back in place, so the end of the cording shrinks back into the piping fabric. Trimming and notching your seam allowances around the curves will help the seams lay flat.


I also employed hand stitches along the front neckline curve to stitch the seam allowance to the bodice lining. Had I trimmed and notched this seam allowance a bit more before I serged, this step may not have been necessary. Keep in mind though, that a few hand stitches can make your finish all that more professional looking!

Will you give double piping a try? The technique can lend a great detail to collars too. You might try it out on the Avery Dress for example. Have fun experimenting!

Invisible Stitch Knit Binding

Monday, April 16, 2018


I love learning new sewing techniques, and when I do, I like to pass them along to you. We have previously posted 3 techniques for knit binding, so today I bring you a fourth with a special twist. The stitching is nearly invisible!! This binding method also reduces a little bulk if you happen to be using a thicker rib knit for the binding. I am using the Modkid Malibu Dress for this example, but the technique can be applied in multiple situations. Be sure to check out our Malibu Sew-Along for additional tips.


If you are new to sewing with knits, be sure to check out our Tips for Sewing with Knits. You will notice my binding strip is slightly shorter than the fabric piece. Binding should always be stretched slightly as you sew, so the end result will lay flat. Keep this in mind as we proceed. The seam allowance for the pattern is 1/2" and the binding width is 1.5". I am using ribbed knit in this case, but other knit types with good stretch and recovery would work well here. This technique would not apply to woven binding.

First, stitch the binding to the main fabric right sides together with a 1/2" seam allowance and a stretch stitch, stretching the binding slightly as you stitch. Here, I have used my serger that trimmed the seam allowance as I sewed. If you are using a regular sewing machine, be sure to stitch with a stretch stitch. Then trim the seam allowance to 1/4". A stretch thread such as Maxi-lock thread in your bobbin with provide additional stretch to the seam.


Press the seam open and the seam allowance toward the binding.


Wrap the binding around the seam allowance to the wrong side and press well.


Select a straight stitch on your machine. The triple stitch, number 6 on my machine, is perfect in this situation. It makes a straight stitch that still stretches by creating 3 back and forth stitches for every 1 stitch in length. Melissa of Melly Sews recently posted a great video showing this stitch. I recommend, again, using stretch thread in your bobbin. If your machine does not have the triple stitch, using a long straight stitch with stretch thread in the bobbin may still work. Test out the stretch to make sure it is sufficient.


To create the "invisible" stitch, you will stitch in the ditch between the main fabric and the binding. An edge stitch or blind hem foot can help keep the alignment here.


For best results, match the thread to the main fabric not the binding. You can just barely see the stitches in the lighter stripe of the fabric.


The raw edge of the binding remains exposed on the wrong side of the fabric, but one of the beauties of sewing with knits is that the fabric will not unravel. If the raw edge tends to curl, you can trim it a bid closer to the stitch line.


Always give your garment a nice, steamy press when complete to make sure any knit that gets slightly stretched in the process of sewing shrinks up to it intended shape.


Other patterns where this method might come in handy are the Modkid Lexi and the Malibu Misses. Be sure to let us know if you give this a try! 

Sewing Tips and Tricks: Stretch Velvet

Friday, January 05, 2018


Just before the holidays I sewed the Modkid Aubrey in stretch velvet fabric. Since stretch velvet is hot, hot, hot this season, I thought I would pass on a few tips that I learned.

FABRIC PREPARATION:
Many instruct you to dry clean only. I had no issues with pre-washing the fabric on cold and tumble drying on low. I plan to wash the finished garment on cold and hang to dry for longevity.

PATTERN SUGGESTIONS: 
Use patterns that do not require a lot of topstitching and keep the thickness of your fabric in mind. Tight gathers will result in very thick seams. Stretch velvet can be dressed up in the case of this Modkid Aubrey, or it can take on a more casual look such as with the Modkid Tessa jogger set or Modkid Annika.

CUTTING:
Even though you may not notice a nap (The fibers on a fabric like velvet or corduroy lie in a particular direction, known as “nap”.) visually, you can determine a velvet nap by touch. Running your hand down the length of the fabric in one direction will feel very smooth while the other direction will have more friction. Traditionally, the pile should run down the garment, so when you run your hand from top to bottom, the velvet will feel smooth. It is key to cut all pattern pieces in the same direction just as you would with a directional print.
I found this tip after I had cut my pattern pieces, and it makes a lot of sense. Folding the fabric with right sides together will allow the nap to "grab" onto itself and reduce fabric slippage. If you opt to cut the fabric wrong sides together, use LOTS of pattern weights.

PRESSING:
Steam is your best friend! Gently finger press seams, then apply lots and lots of steam on the wrong side of the fabric. You may not even need to touch the iron to the fabric.
To protect the right side of your fabric from getting crushed while pressing the wrong side, try placing a scrap of your velvet with the pile facing up on your ironing board. Alternately, try using a towel or piece of terry cloth on the surface.

SEWING:
I use the same practices I would for sewing knits when sewing velvet. You can find our Tips for Sewing with Knits here. Sewing stretch velvet should not be intimidating!! When sewing seams, the fabric nap grabs onto itself, so the fabric does not slip around as you might think. The only additional suggestions, I would include is to use binding clips in lieu of pins as they are easier to use with thicker fabrics and to increase your typical stitch length.

HEMMING:
If possible, as I did in the Aubrey, increase your hem allowance and use a blind hem stitch by hand or machine. Another option is to finish the raw edge, turn under, and use a long stretch stitch. If the garment is not form fitting at the hem, a long straight stitch will do just fine.


For notes on the slight additions I made to the Aubrey pattern, check out the post at Sweeter Than Cupcakes. 

Tips and Tricks: Creating Perfect Pleats

Thursday, July 27, 2017


Today, I am posting a quick tutorial for three different styles of pleats. There are a variety of ways to tackle pleats, but this pleat tutorial shows the methods that are featured in several Modkid patterns. I'll link a few patterns at the end of each tutorial. 

Pintucks:


Pintucks are a fun way to add texture to your fabric. Start by marking your fabric were you want the pintucks. Pintucks may be dictated by a pattern, or you may sew pintucks in place on a block of fabric and cut your pattern piece for your own design. It is important to mark nice, straight lines.


Fold and press the fabric wrong sides together along the first mark. Stitch close to the folded edge of fabric, 1/8" at a maximum.


Repeat folding wrong sides together, pressing, and stitching for each mark.


Press the pintucks to one side. Your piece is ready to be sewn into a garment or cut down into a pattern piece. Pintucks are featured in the following patterns:


 Pleats:


This method of sewing pleats is acutally almost identical to pintucks. Again, mark your pleats in nice straight lines. These will fall farther apart than pintucks since they take up more fabric.


Fold and press the fabric wrong sides together along the marked line. Determine the depth of pleat you desire and stitch that distance from the edge. In this case 1/2". 


Repeat folding wrong sides together, pressing, and stitching for each mark. Finally, press the pleats to one side. For pleats without the stitch line simply baste the pleats in place along the side edges. Finally, press the pleats to one side. Great pleat patterns include:


Inverted Box Pleat:


Box pleats are essentially two pleats sewn back to back. You will need 3 marks equal distances apart.


Press the fabric wrong sides together along the right outside mark.


Bring the folded edge to the center mark and press.


Here's what that looks like from the top side.


Repeat folding the wrong sides together and press for the left outside mark. Bring that folded edge in to the center mark and press.


This is now the top view.


Baste across the top edge to secure the pleat in place. Done! You can find inverted box pleats in the following patterns:


Tips and Tricks: Make Your Own Bias Tape

Friday, April 28, 2017

In light of our up-coming Kyoko Sew-Along we thought we would post a helpful tutorial on making your own bias tape. This is such a fun way to add personality to your trim! We will refer back to this tutorial on Day 2 of the sew-along.

Tips & Tricks: Elastic Waistband

Friday, May 27, 2016


Included in the Modkid Perfect Legging pattern is our favorite knit waistband tutorial. What makes it so great? NO CASING!! Plus, it lays flat, and the elastic won't twist inside a casing. You just might find it to be your favorite too! We are going to show you just how we do it here too.


Stitch your pre-cut elastic into a circle. If you don't have a length provided in your pattern, 1-2" less than the length around the wearer's waist is a good rule of thumb. The elastic should be cut shorter than the waist measurement since it will stretch out when sewn and worn. To minimize bulk, just meet the ends of the elastic and stitch a wide zigzag across the edges. You may stitch several times over the area to reinforce the seam. Give it a tug, and you will find a nice sturdy connection.


Quarter mark your waistband and elastic. Do this by folding the elastic at the seam and marking the opposite fold. Now, bring the seam and the new mark across from one another to divide the band in the other direction. Similarly mark the leggings.


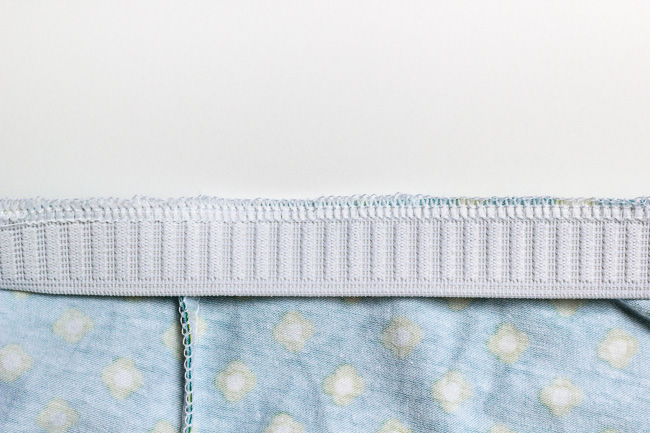
Align the elastic seam with the back seam of the leggings and pin to the wrong side of the fabric. Align the elastic edge with the raw edge of the leggings. Continue to pin at the quarter marks stretching the elastic to fit. Pin in between the quarter marks if desired. Serge or zigzag the top edge of the elastic, catching the raw edge of the fabric beneath. Stretch the elastic slightly as you do this, but do not stretch the fabric. I like to make sure my serger knife is disengaged at this point.


Fold the elastic down toward the wrong side of the garment, encasing the elastic and keeping the fabric taut around the elastic. Pin in place.  From the right side of the garment, topstich the bottom edge using either a Coverstitch machine, a twin needle on your sewing machine, or a wide zigzag stitch.


A flat and easy finish, just like we like it!!

Tips & Tricks: Knit Neck Binding 3 Ways

Friday, April 29, 2016


Today, I'm going to shed a little light on various methods for finishing a knit neckline. With some traditional methods and some non-traditional, you have options, so choose your favorite! 

Be sure to check out our Tips for Sewing with Knits before you begin. Using a ballpoint needle and stretch thread in your bobbin are some keys to success. 

NON-TRADITIONAL BINDING


I have started with a strip of fabric that is 2" wide. A good rule of thumb for the length of all of these bands is 10% shorter than the length of the neck opening. The band needs to be slightly shorter than the neck opening to lay flat when worn. I would recommend using a little wider neck binding than I used here, 2 1/2" to 3" would be good. Press the long side in half wrong sides together.


Open up the crease, and sew the short ends right sides together.


Press the seam allowance open.


Refold the band along the center seam.


Place pins in the neckband to mark at the center front, back, and halfway between each side of the binding piece.


Turn the shirt wrong side out. Align the raw edges, and pin the neckband to the wrong side of the neckline at the marked locations starting with the neckband seam at the back. The other marked locations will be at the shoulder seams and the front center. Pin the band in between stretching it slightly to fit the neckline.


Stitch the band to the shirt with a 1/4" seam allowance and a stretch stitch. Press the neckband and seam allowance away from the shirt.


Fold the binding over the neckline edge and pin in place encasing the edge of the neckline. Do not fold the neckline edge over in the process.


Topstitch around the folded edge with a stretch stitch or twin needle. Press well.

TRADITIONAL NECK BINDING


For this method, I have started with a strip of fabric that is 2" wide. A good rule of thumb for the length of all of these bands is 10% shorter than the length of the neck opening. The band needs to be slightly shorter than the neck opening to lay flat when worn. Sew the short ends of the band right sides together and press open.


Place pins in the neckband to mark at the center front, back, and halfway between each side of the binding piece.


Pin a raw edge to the neckline right sides together at the marked locations. Here, I aligned the neckband seam with the shoulder seam. The other pins would then be at the opposite shoulder, the center front, and the center back. Continue pinning in between, stretching the band slightly to fit.


Stitch with a stretch stitch and 3/8" seam allowance.


Press the band and seam allowance up away from the shirt.


Fold the band over the edge of the neckline while tucking the raw edge to the center encasing all raw edges. Think of this the same as you would bias binding. Lots of pins helps here.


Tuck a tag in the back if desired. Topstitch from the right side along the edge with a stretch stitch or twin needle.

NECK BAND


For this method, I have started with a strip of fabric that is 2" wide. A good rule of thumb for the length of all of these bands is 10% shorter than the length of the neck opening. The band needs to be slightly shorter than the neck opening to lay flat when worn.


Press the neckband in half along the long side with wrong sides together. Open up the fold and sew the short ends right sides together with a 1/2" seam allowance. Press the seam allowance open and refold the band along the center crease.


Place pins in the neckband to mark at the center front, the center back, and halfway between these points. Pin the neckband to the right side of the neckline at the marked locations starting with the neckband seam at the shoulder seam. The other marked locations will be at the opposite shoulder seam, the center front, and the center back. Pin the band in between stretching it slightly to fit the neckline.

Stitch the neckband to the neckline with a stretch stitch or serger. Here I stitched it in place first, then finished the edge with the serger. Press the seam allowance toward the shirt and the neckband away from the shirt. Optionally, topstitch the seam allowance with a stretch stitch or twin needle.

Experiment with these methods to find your favorite!! Suggested patterns for these tips include Melanie, Breeann, Melanie Misses, Rachel, Morgan, Penny, and more!!
Proudly designed by | mlekoshi Playground |